Saturday, January 29, 2011

After a Cooking Class


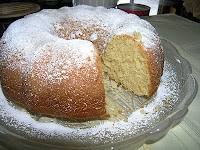
Lemon~Yogurt Cake


Here I am, feeling rejuvenated after giving a cooking class today. I can be tired, overwhelmed with day-to-day responsibilities but when I start cooking and sharing my food with others I forget everything else. A great feeling of satisfaction, happiness, creativity and a sense that I am able to connect with more people through my cooking fills me up and helps me forget everything else!

I gave a demo class on winter recipes from Cyprus. I made bulgur soup with fresh vegetables and herbs such as marjoram, cumin and cinnamon, potato, artichoke and olive stew, stuffed onions and a lemon~yogurt cake for dessert. Today, I chose recipes that I could use seasonal ingredients.

Once again I got lots of questions about the Mediterranean diet. Basically, the questions were all around the theme of what is the Mediterranean diet or what constitutes this special diet. I shared with the class that when I talk about the Mediterranean diet I refer to olive oil, yogurt, fresh vegetables consumption and eating seasonal. This is how I grew up. A lot of people still eat like this back home but sadly a lot of people have also succumbed to the fast food diet.

I grew up eating based on the seasonal produces and not what was selling in the grocery stores. For instance I never ate eggplant other than during the summer and ate strawberries only in May and June. Eating seasonal one can avoid the extra hormones and chemicals which are used to grow vegetables. I know that there are organic farms growing certain vegetables which are out of the season but no matter what I find these vegetables not as tasty as they are when they are actually in season.


My dad with his fruit trees; he taught me to eat lots of fresh fruit and vegetables by the season

I am sharing with you the easy recipe of making the delicious yogurt~lemon cake one of my favorite cakes since it has two of my favorite ingredients – lemon and yogurt! ... and I am happy to say that for the first year I was able to get lemons from my tree in my back yard! I had 4 other lemon trees die before I was able to have a nice healthy tree! I can't wait till the day I can make my own lemonade from my own lemons.
 
It’s a light and moist cake that’s delicious with coffee, tea or on its own. In my house it lasts only for two days so I don’t even have to refrigerate it! It’s such an easy cake to make that you can easily stay away from the cake mixes out of the box which take the same amount of time to put together and they don’t taste as good as this cake!

1 ½ cups sugar
¾ cup unsalted butter
4 eggs
2 cups white unbleached flour
3 teaspoons baking powder
2 tablespoons lemon zest

For the Top
½ cup powdered sugar

Beat the eggs well until fluffy and set aside. In another deep bowl mix the butter with the sugar. Beat well and then start adding the eggs slowly. Add the yogurt and then start adding all the remaining dry ingredients; baking powder, and flour except for the lemon zest. Beat well. Add enough flour so that the batter is thick enough but it does not stick to the spoon.
Lastly, add the lemon zest.
Bake in a round baking pan at 350 F degrees for about 35 to 40 minutes – time might vary according to the oven temperatures.
Insert a toothpick to check if it is fully baked. The toothpick should come out completely dry.
Remove the cake from the pan after it cools off a bit.
Sprinkle with powdered sugar.
Serve at room temperature.

It is served with tea or coffee
May be stored outside the refrigerator for 2-3 days


I hope you share with friends and family.

Please post any questions or comments you might have.

Till next time ....

Litsa


Thursday, January 20, 2011

Chickpeas with Spinach – Ρεβυθια με Σπαναχι


Chickpeas with spinach and tomatoes doesn’t sound very exotic to some food enthusiasts but it’s definitely a delicious meal to me. It was one of my favorite dishes growing-up.
It’s nutritious, healthy and tasty! In Cyprus, it’s quite common to serve different kind of beans as main dishes. This is one of them.

Chickpeas are probably the most nutritious type of beans and so is spinach in the vegetable arena! What a dynamic combination in this dish. :-)

It’s an easy dish to make after you cook the chickpeas and you take the shells off. You can leave the shells on but they will be lighter on the stomach if you do. I can definitely assure you of that.
  
2 cups dry chickpeas
2 teaspoons baking soda
1 cup chopped tomatoes
3 teaspoons tomato paste
1 bunch fresh spinach or 5 cups chopped spinach
¾ cup olive oil
½ cup chopped yellow onion
5 cups of water
Salt
Pepper

Place the chickpeas in a bowl with 2 teaspoons of baking soda and enough water to cover them completely. Let them soak overnight or for about 8 hours. By the following morning they will double in size.
Drain the water.  Let some cold water run through them.
Spread them out on a clean cloth kitchen towel. Cover them with a second towel. Start rolling an empty bottle over them or a pastry rolling pin. Press down hard so the chickpeas crack. Once they are cracked it is easy to peel the shells off.


Place a deep saucepan on high heat. add the onions and half of the olive oil. Sauté until the onions are soft. Add the chickpeas and stir a few times. Add the 5 cups of water.
Let them come to a boil.  Reduce the heat to medium low. Add the tomatoes, tomato paste, salt, pepper and remaining olive oil.
Wash the spinach in cold water. Cut the stems off. Get rid of any excess water with paper towels.
Let the chickpeas cook for about an hour. Add the spinach.
Add some warm water if needed to cover the chickpeas completely.
Stir well and let them cook for another 30 minutes or until the chickpeas are tender and they can easily be split with a fork. By the time the chickpeas are fully cooked, the sauce should have also thickened up.

Serves 4-6

You can definitely use canned chickpeas for this recipe but you are compromising on the taste of the dish if you do.

Serve this dish with some sardines or herring on the side, black olives and bread.


 You can easily keep this in the refrigerator for a few days if it’s not consumed right on the first day!

Every taste has a story to me. The story that comes to me right now related to this dish is that the food that I craved the most while I was hospitalized years ago was actually this dish. Once I started getting better and could eat anything my mom asked me what I craved so she could cook it for me and bring it to the hospital – I said chickpeas with spinach. When I said that I could see the surprise even in my mom’s face that out of all the foods I chose beans! 

To me a meal can be delicious even if it consists only of a couple of ingredients and it’s easy to prepare. I firmly believe that it’s the combination of ingredients that makes something taste good or bad. Some of you can definitely tell me that sardines taste bad. I will say not to me but it all comes down to personal taste.

Enjoy making this dish perhaps with some of your own variations to suit your own personal taste.
And enjoy sharing it with your friends and family.

Και καλη ορεξη – good appetite.

Till next time, stay well!

Litsa


Thursday, January 13, 2011

Soupa Yiouvarlakia – Σουπα Γιουβαρλακια


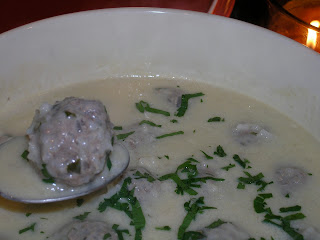
Since I have started fighting the flu during the past 5 days, the only thing I have been craving for it’s comfort food. Comfort food to me is rich, hot and creamy. So I decided to make one more comfort soup (following my trahana soup) to soothe my sore throat. My daughter’s favorite soup – soupa yiouvarlakia - σουπα γιουβαρλακια - as we call it in Greek. This soup is hot, rich and creamy! It’s a soup with meatballs in egg lemon broth – avgolemono - αυγολεμονο.
Agvolemono sauce is used in other soups as well as other dishes. Number of lemons and or eggs used may vary and there is no right or wrong. It’s all a personal taste. My mom for instance likes her egg-lemon sauce really creamy so she adds more eggs; it’s not very healthy but it tastes really good. Intentionally, I have cut down on the number of eggs I use.

Luckily, I had some ground beef in the freezer that I recently bought.  The ground beef I had bought had very little fat because I bought it at the local international store. I usually pick a nice lean piece of beef and I have the butcher grind it for me. I used it tonight for my soup and the result was excellent.
Till this day my father advises me to go to the local butcher and choose my own meat instead of buying it at the supermarket already ground and packaged. He says - you have to see what you are getting! :-).


It’s an easy and delicious soup that makes adults as well as children quite happy.

1 pound ground beef or lamb
1 cup long grain rice
1/3 cup chopped flat leaf parsley
1/3 finely chopped or grated onion
5 tablespoons olive oil
2 quarts chicken stock
Salt
Pepper
1 dash ground nutmeg
3 eggs
1 lemon

For the Top
Finely chopped flat leaf parsley

In a bowl mix the ground beef or lamb, half of the rice, grated onion, finely chopped parsley, 3 tablespoons of olive oil, nutmeg, salt and pepper. Form small balls of 2 inches diameter.
You will be able to make approximately 20 meatballs.
In a deep saucepan add the chicken stock, and the remaining olive oil. Cover with a lid. On high heat let it come to a boil.
Remove from the heat. Add the remaining rice and then start adding the meatballs into the pot. Place back on medium-low heat and let the soup cook for approximately 30 - 40 minutes or until the rice in the meatballs is fluffy and soft. While cooking have it covered with a lid.

In a separate bowl beat the eggs well until fluffy. Gradually add the lemon juice.
Mix well. You need to temper the egg and lemon juice mixture.
With a small ladle add some hot juice from the soup into the egg and lemon mixture and whisk well. Repeat this step a few times until the temperature of the eggs is about the same as the temperature of the soup. You are doing this because you don’t want the eggs to curdle.

Once the egg and lemon mixture is hot, add into the soup with the meatballs and stir well for about a minute or two.
Serve immediately after sprinkling some chopped parsley on top.


Serve hot.

Serves 4-6

Sunday, January 9, 2011

Trahanas Soup - Simple, Healthy & Delicious


Soupa Trahanas
 
We have started the new year with unusually cold weather in the Sacramento area with daily temperatures in the 40's and 30's - yes, that quite cold for someone who grew up in Cyprus.

The first soup I thought of making was trahanas because of it's simplicity, delicious taste and high nutritious value.This is my favorite winter soup. Having this soup always brings me back childhood memories sitting at the table for dinner with my whole family and having the soup along with lots of bread and sometimes boiled chicken on the side or inside the soup. If the chicken was on the side we always ate it with lots of lemon and seasoned it with salt and black pepper. I remember my dad always having two large servings of trahanas soup along with lots of bread.

He always liked to add pieces of the bread in his soup. Greeks love to eat bread with every meal and with any kind of food.

 This is the kind of soup that you either love  or dislike because of its unique flavor. It has a light and yet hearty flavor. A bowl of this soup can easily fill you up and leave you satisfied without eating anything else.  In Cyprus we only serve the sour trahanas made with yogurt while in other parts of Greece a different kind of trahanas is also served that it’s sweeter and made with milk.

I buy my trahana from local International grocery stores.
 
Trahanas is basically made out of wheat and yogurt. Being a yogurt lover is easy for me to like the flavors of this soup. I know it’s a soup that it’s served in many parts of the mainland of Greece but in Cyprus it’s one of our signature winter foods.
 
My aunt Magda in Chicago still makes her own Trahana and halloumi cheese for this. We always add a lot of halloumi in this soup cut into small bite-size square pieces.

Halloumi is a traditional cheese of Cyprus. Nowadays it is sold worldwide and it can be found in a lot of local supermarkets even in the Sacramento area! I still like to bring some special halloumi brands when I go back home. Halloumi can be made with cow's, sheep or goat's milk. My favorite it's the one made with goat's milk.

Halloumi is quite a popular cheese. Part of its popularity is attributed to its versatility. It’s the only cheese that can be fried, grilled, grated, baked, eaten as is and never melts. It’s a wonderful cheese that looks a little bit like mozzarella but it holds it’s consistency without melting. I have never made my own halloumi even though I aspire to do so under the supervision of aunt.
 
Here is my recipe for trahana soup. Please keep in mind that you can add chichen or beef pieces in this soup.
 
4 cups trahana
4 cups chicken or vegetable broth
1/2 Halloumi which is approximately 3/4 of a cup cut in small cubes
1 large tomato - optional
Salt
Black Pepper
 
Soak the trahana in water for a few hours. Transfer into a large deep pot with the water. Put the blanched tomato at the bottom of the pot. Add the broth and let it come to a boil. Reduce the heat to medium-low. Let it simmer for 30 minutes. Add salt and pepper to taste. Stir occasionally. If it's too thick add a little bit more water.

A helpful tip is that when you reheat it the following day add a little bit of more water. The soup might thicken-up a bit because of the wheat content.

Serve hot with bread on the side.

Serves 6-8


Till the next blog post, stay warm :-)


Sunday, January 2, 2011

Happy 2011!!!


Happy New Year to all of you! May the New Year be filled with Joy, Health and Prosperity!

The busy holiday season is behind us. All the vigorous cooking, entertaining, sharing, eating and simply having fun is over. I am a little bit sad that the holiday season of sharing is over but I remind myself that it can continue all year long. We can always entertain, cook, have fun and share with friends and loved ones all year long. It’s actually nicer in my opinion because we can do all these without the commercial buzz.

Well for Christmas dinner I prepared stuffed Cornish hens. I grew up celebrating Christmas on December 25th and not on Christmas Eve like it’s done in many other cultures. The most important dinner was the one on Christmas day, December 25th. We usually had stuffed turkey or just stuffed chickens back home so that’s what I wanted to have for Christmas dinner this year. I stuffed 6 Cornish hens which was a lot of food for 6 people I had over for dinner but as usual I cooked more than I should have.
Growing up and living in Cyprus most of my life, I always saw and experienced so much cooking when people would come over for dinner which is hard to describe. We always had a lot more food than we needed. As a Greek you never cook just one dish for your guests and you never cook just enough for the people you are feeding! You need to cook a lot so you have left overs. Till this day I am trying very hard to shake off this habit.

My stuffing consisted of rice, roasted chestnuts and pine nuts, chicken liver, raisins, onions and spices. I simply love this stuffing but I know that partly it’s because it brings back fond childhood memories of family holiday dinners.

Ingredients for stuffing 6 Cornish hens:
2 cups long grain white rice
½ pound of roasted chestnuts
½ cup roasted pine nuts
½ cup raisins
1 cup finely chopped yellow onion
½ pound chopped chicken livers
1 teaspoon cinnamon
Salt
Pepper

For baking:
10 bay leaves
6 small cinnamon sticks
1 cup virgin olive oil
2 cups water
6 teaspoons unsalted butter
Oregano
Salt
Pepper

A little trick that I use which my mother taught me is to rub the hens or the chickens with lemon inside – out before stuffing. It gives the meat a very nice flavor. After I finished prepping with the lemon, I seasoned with salt, pepper and oregano.

When I stuffed the hens – filled completely the cavity of each hen with stuffing - I closed the cavity with a piece of kitchen twine. I rubbed some unsalted butter over them, and added a few bay leaves and cinnamon sticks under their wings for extra flavor. I drizzled about a cup of olive oil over the hens, added a couple of more cups of water in the baking pans, (I had to use two pans) covered the pans with aluminum foil and place them in the oven. I baked at 400 degrees in a pre-heated oven for about 2 hours. During this time I basted the hens every 30 minutes. At the end of the second hour I uncovered the pans and baked for another 30 minutes at 350 degrees till the hens had a nice brown color on top.

I served them with roasted carrots and pearl onions in honey and orange zest, my friend’s Amy’s green beans casserole, mushrooms cooked in red wine and coriander and baked potatoes.
Yes, the meal was yummy and it was wonderful to share it with good friends from around the world – Germany, Belgium, Spain, France and the good U.S. of America :-)

I took photos of the hens before I cooked them but then with all the excitement after everyone arrived I forgot to take photos of the finished product!  :-)


Of course we had appetizers, the Greek spinach puffs which are called spanakopittes, and  shrimp skewers in pesto sauce, olives, different kinds of cheese and tomatoes in olive oil and oregano along with a very tasty mulled wine that my friend Veronika prepared. 

The delicious Cornish hens can be served at any time of the year and not just during the Christmas holidays!
I hope you prepare this meal and you enjoy sharing it with friends and family!